
Heres Some Camping Tips & Tricks at Your Fingertips
Our Kiefer Campground Blog is the information you need to make your next camping trip even more enjoyable. From RV and camping tips and tricks, to amazing campfire recipes, to advice on planning your next trip... the information below is here to help you. And please, feel free to comment and share your experiences, knowledge and favorite recipes. At Kiefer Campground, we are a family and all here to help each other enjoy the great outdoors to the fullest!

Grilled Cheese Recipe
Here’s a simple and delicious grilled cheese recipe perfect for camping:
Ingredients:
- Bread (sliced, your choice of type)
- Cheese (cheddar, white cheddar, gouda, mozzarella, or your favorite type)
- Butter or margarine
- Optional: additional fillings (tomatoes, ham, bacon, etc.)
Equipment:
- Campfire or portable stove
- Cast iron skillet or griddle
- Spatula
Instructions:
- Prepare the Fire/Grill:
- If using a campfire, get a good bed of hot coals going. If using a portable stove, set it to medium heat.
- Butter the Bread:
- Spread butter or margarine evenly on one side of each slice of bread.
- Assemble the Sandwich:
- Place a slice of cheese (and any additional fillings if using) between two slices of bread, with the buttered sides facing outwards.
- Heat the Skillet:
- Place the cast iron skillet or griddle over the campfire or stove and let it heat up.
- Cook the Sandwich:
- Place the assembled sandwich on the hot skillet. Cook until the bread is golden brown and crispy, usually about 2-3 minutes per side. Use the spatula to press down gently to help the cheese melt.
- Flip and Cook:
- Carefully flip the sandwich with the spatula and cook the other side until it is also golden brown and the cheese is melted.
- Serve:
- Remove the sandwich from the skillet and let it cool for a minute. Then, slice it in half and enjoy your delicious grilled cheese.
Tips:
- Keep an eye on the heat to prevent burning. Adjust the skillet’s position if necessary.
- Experiment with different types of bread and cheese for variety.
- Add some herbs or spices for extra flavor.
Enjoy your grilled cheese sandwiches at Camp Lakewood Campground!
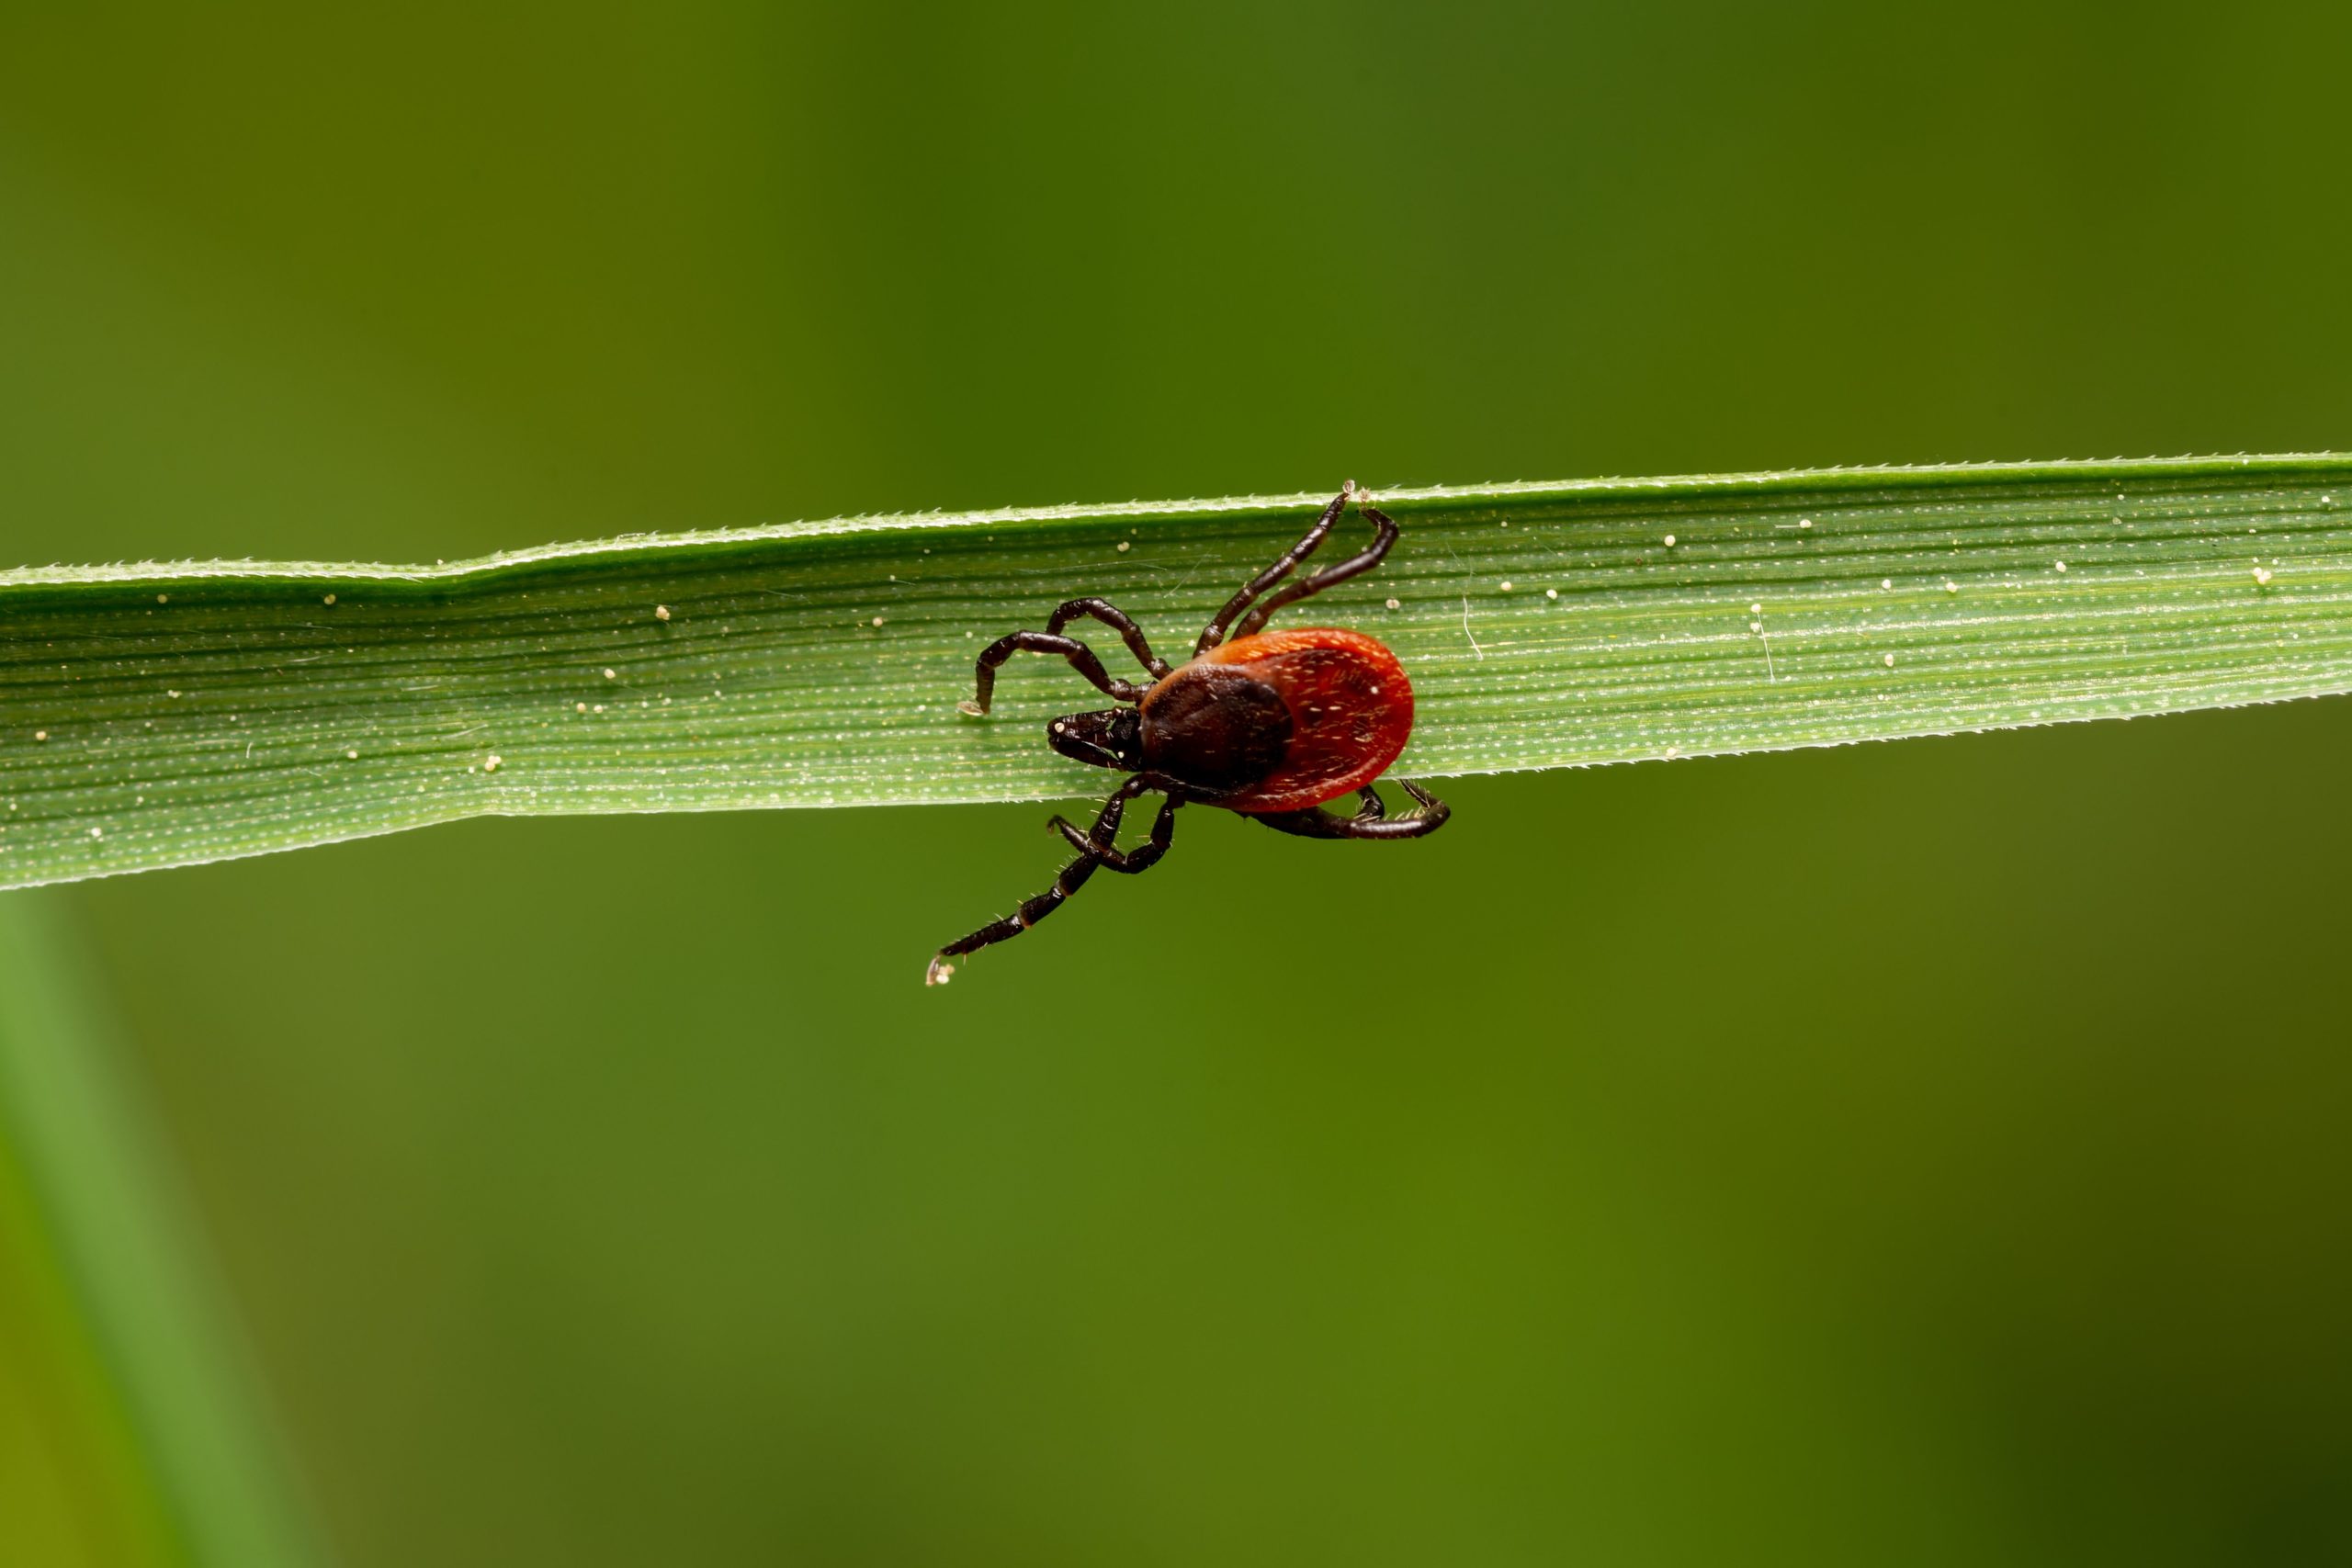
Types of Ticks
Ticks are small arachnids that feed on the blood of mammals, birds, and sometimes reptiles and amphibians. There are several types of ticks, each belonging to one of two main families: Ixodidae (hard ticks) and Argasidae (soft ticks). Here are some of the most common types of ticks:
Hard Ticks (Ixodidae)
- Blacklegged Tick (Ixodes scapularis)
- Also known as the deer tick.
- Found primarily in the northeastern, mid-Atlantic, southeastern, and north-central United States.
- Known for transmitting Lyme disease, anaplasmosis, babesiosis, and Powassan virus.
- Western Blacklegged Tick (Ixodes pacificus)
- Found along the Pacific coast of the United States, especially in California.
- Also a vector for Lyme disease and anaplasmosis.
- American Dog Tick (Dermacentor variabilis)
- Found in the eastern half of the United States and parts of the West Coast.
- Known for transmitting Rocky Mountain spotted fever and tularemia.
- Rocky Mountain Wood Tick (Dermacentor andersoni)
- Found in the Rocky Mountain states and southwestern Canada.
- Can transmit Rocky Mountain spotted fever, tularemia, and Colorado tick fever.
- Brown Dog Tick (Rhipicephalus sanguineus)
- Found worldwide and can thrive in homes and kennels.
- Known for transmitting canine ehrlichiosis and canine babesiosis.
- Lone Star Tick (Amblyomma americanum)
- Found in the southeastern and eastern United States.
- Known for causing southern tick-associated rash illness (STARI), ehrlichiosis, tularemia, and meat allergy due to alpha-gal syndrome.
- Gulf Coast Tick (Amblyomma maculatum)
- Found in the southeastern United States and along the Gulf Coast.
- Known for transmitting Rickettsia parkeri rickettsiosis and can cause tick paralysis.
Soft Ticks (Argasidae)
- Relapsing Fever Tick (Ornithodoros hermsi)
- Found in the western United States and Canada.
- Known for transmitting tick-borne relapsing fever.
- Fowl Tick (Argas persicus)
- Primarily affects poultry and found worldwide.
- Known to cause significant irritation and anemia in birds.
- Spinose Ear Tick (Otobius megnini)
- Found in the southwestern United States.
- Primarily affects livestock and can cause irritation and secondary infections.
Ticks can vary greatly in appearance, behavior, and the diseases they transmit. Effective tick prevention and control are essential to minimize the risks associated with tick-borne illnesses.
Always try to cover up when being in the outdoors. At Camp Lakewood Campground, we ask to be safe and take caution when hiking or camping.

Camping Mojitos Recipe
Mojitos are a great way to unwind and relax while camping. They are also refreshing too!
Mojito Ingredients:
- 10-12 fresh mint leaves, plus extra for garnish
- 1 lime, cut into wedges
- 2 tablespoons sugar (or to taste)
- Ice cubes
- 2 ounces white rum
- Club soda or sparkling water
- Optional: a splash of soda water or lemon-lime soda for added sweetness
Equipment:
- Mason jars or sturdy cups
- Muddler or the back of a spoon
- Cooler to keep ingredients cold
Instructions:
- Prepare the Mint and Lime:
- Place the mint leaves and lime wedges into the bottom of a mason jar or cup.
- Add the sugar on top.
- Muddle:
- Use a muddler or the back of a spoon to mash the mint, lime, and sugar together.
- This helps release the mint oils and lime juice, dissolving the sugar.
- Add Ice and Rum:
- Fill the jar with ice cubes.
- Pour the rum over the ice.
- Top Up:
- Add club soda or sparkling water to fill the jar.
- Stir well to combine all the ingredients.
- Garnish and Serve:
- Garnish with extra mint leaves and a lime wedge if desired.
- Serve immediately and enjoy!
Tips for Camping:
- Prep Ingredients Ahead of Time:
- Pre-squeeze lime juice and store it in a small container.
- Pre-muddle mint leaves with sugar in a jar so you just have to add the liquid ingredients later.
- Keep Ingredients Cool:
- Use a cooler with plenty of ice packs to keep your mint, lime, and club soda cold.
- Bring Essential Tools:
- Don’t forget to pack a muddler or a sturdy spoon, cups or jars, and a knife for cutting lime wedges.
- Adapt to Your Environment:
- If you’re hiking and need to pack light, consider bringing a pre-made mojito mix in a sealed bottle and just add soda and ice at the campsite.
Enjoy your camping trip with refreshing mojitos!
Enjoy this recipe for Camping Mojitos on your next camping trip to Camp Lakewood Campground!
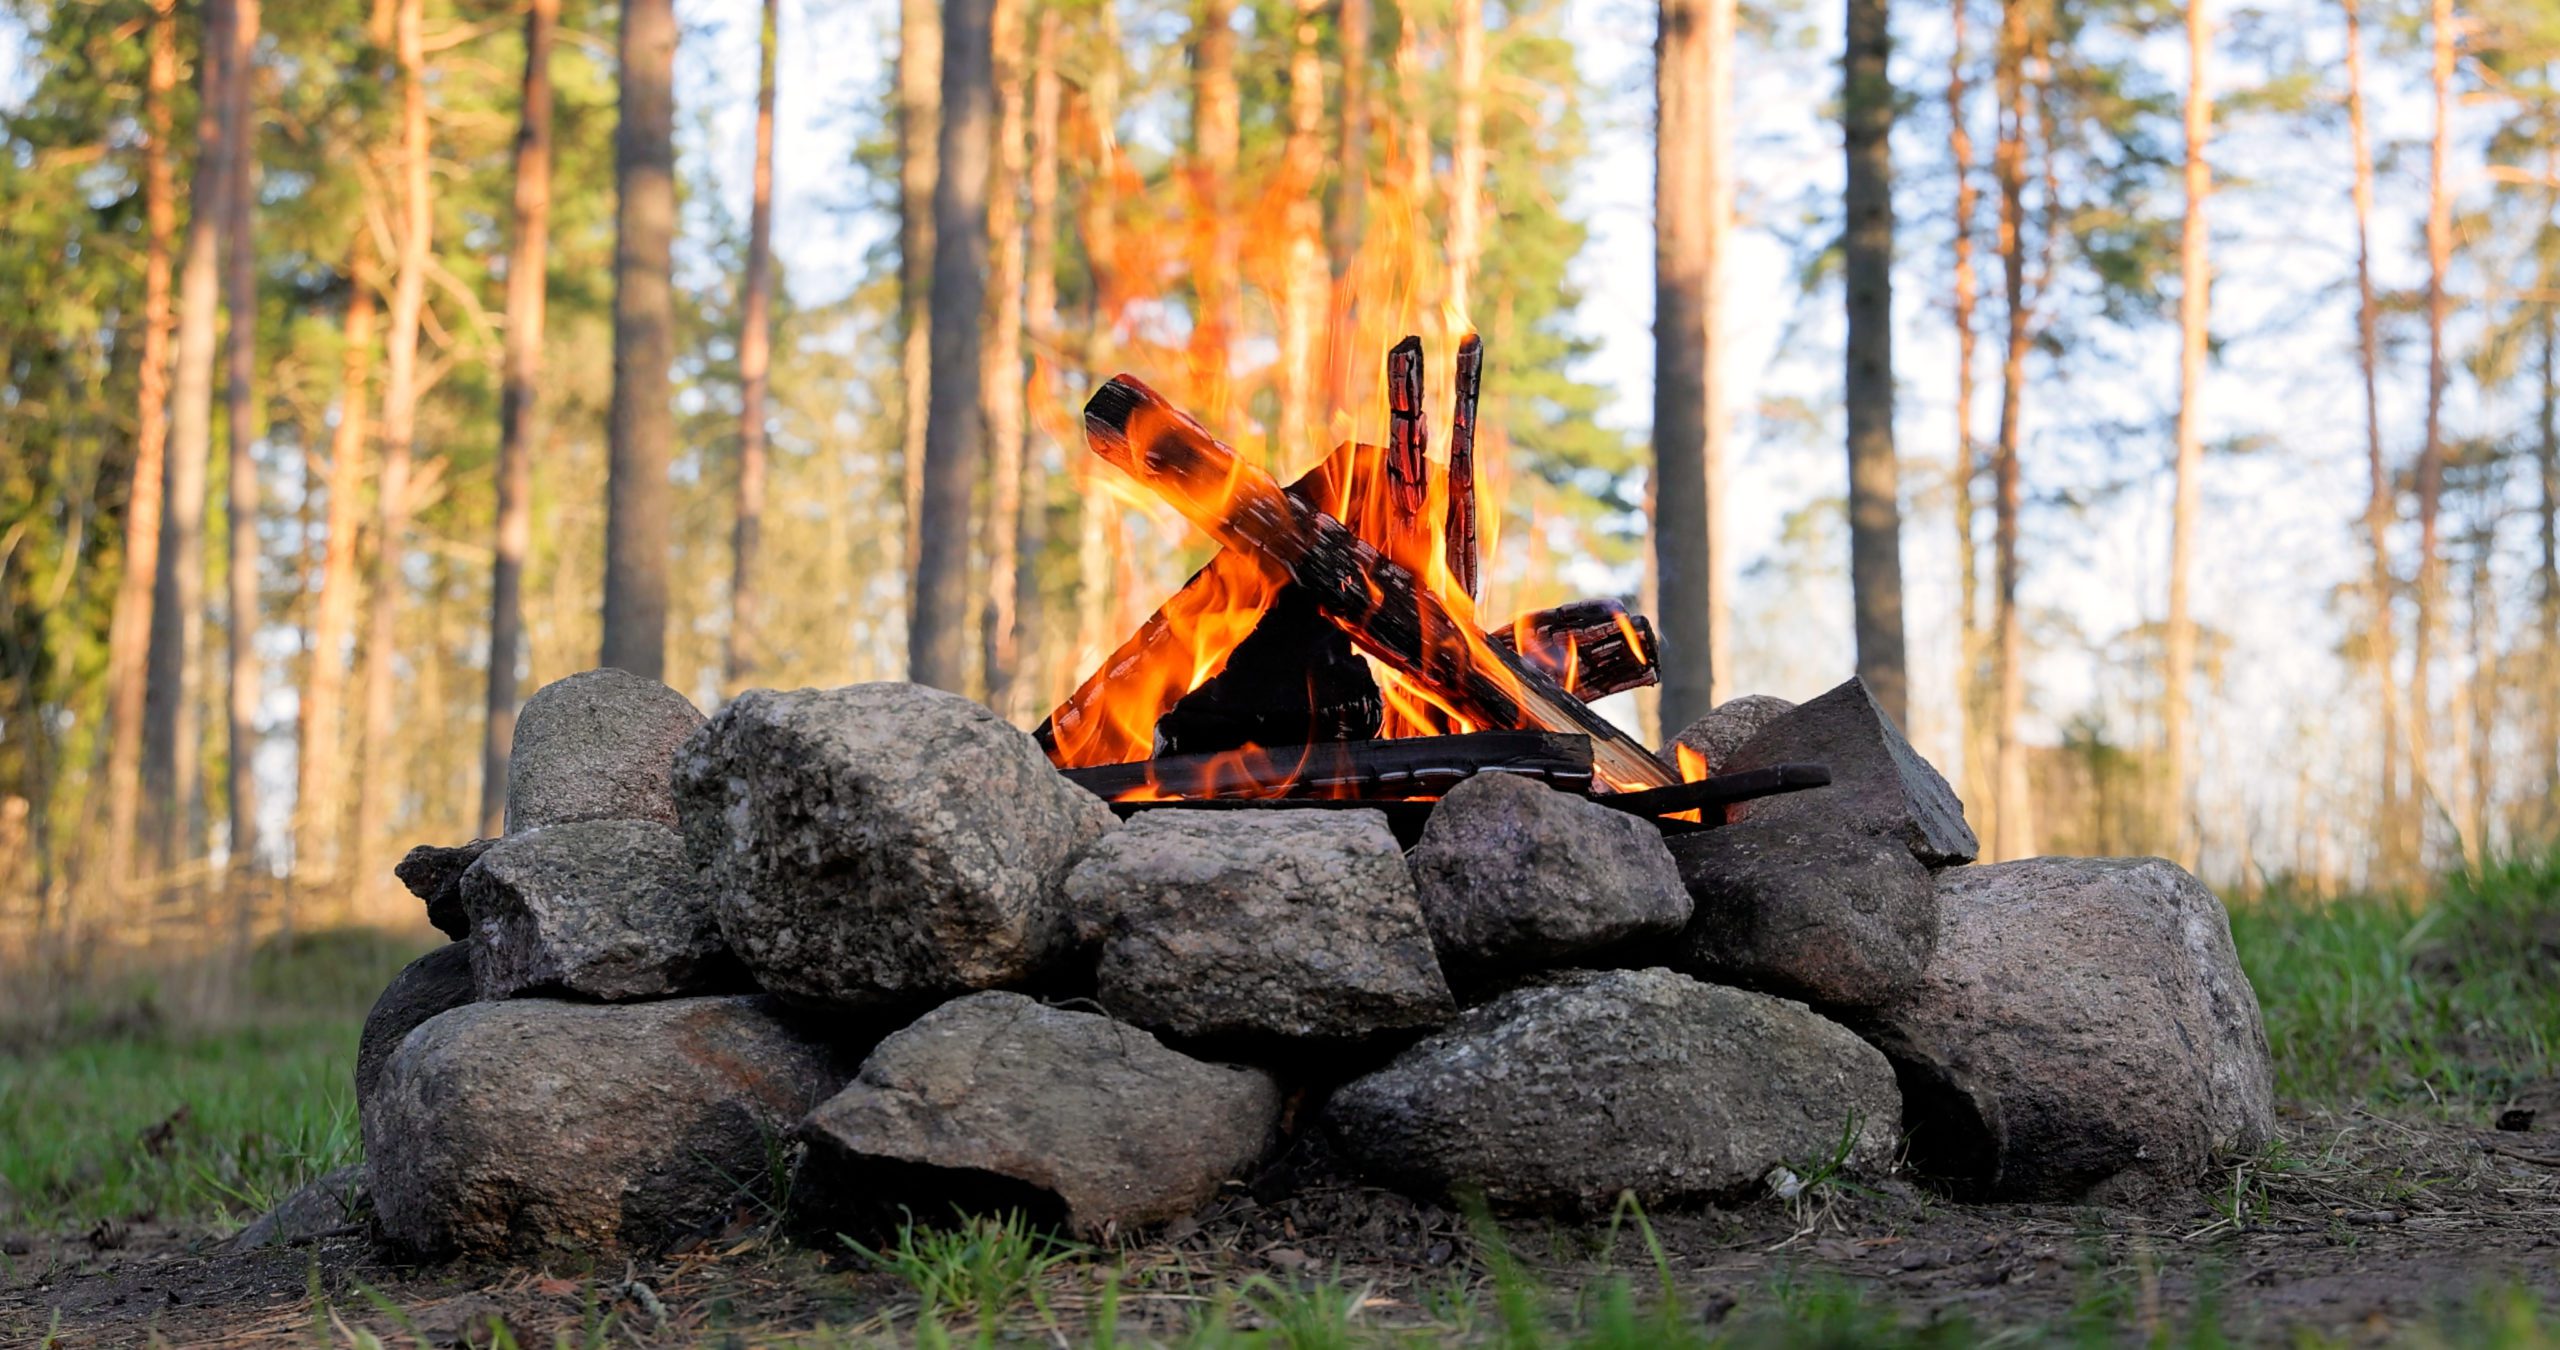
How To Put Out A Campfire
Putting out a campfire safely is crucial to prevent accidental wildfires. Here’s a step-by-step guide:
- Allow the fire to burn down: Let the fire burn down to a point where there are mostly embers and small flames.
- Douse with water: Pour water over the fire, starting from the edges and moving towards the center. Use a bucket or a hose, and make sure to saturate all the embers thoroughly.
- Stir and mix: Use a shovel or stick to stir the embers and ash thoroughly. This helps to cool down any remaining hot spots and ensures that all parts of the fire are extinguished.
- Repeat if necessary: Continue adding water and stirring until you’re sure the fire is completely out. It’s better to use too much water than too little to ensure the fire is fully extinguished.
- Feel for heat: Use the back of your hand to feel for any remaining heat above or around the fire pit. If you feel heat, continue adding water and stirring until the area is cool to the touch.
- Dispose of ashes: Once the fire is completely out and the ashes are cool, dispose of them properly. Scatter the ashes in a wide area away from the campsite, or pack them out if required.
- Check for local regulations: Some areas have specific guidelines for extinguishing campfires, so make sure to follow any rules or regulations provided by local authorities or land management agencies.
Remember, never leave a campfire unattended, and always make sure it’s completely extinguished before leaving the site.
At Camp Lakewood Campground, We ask you to be safe and cautious when handling fire.
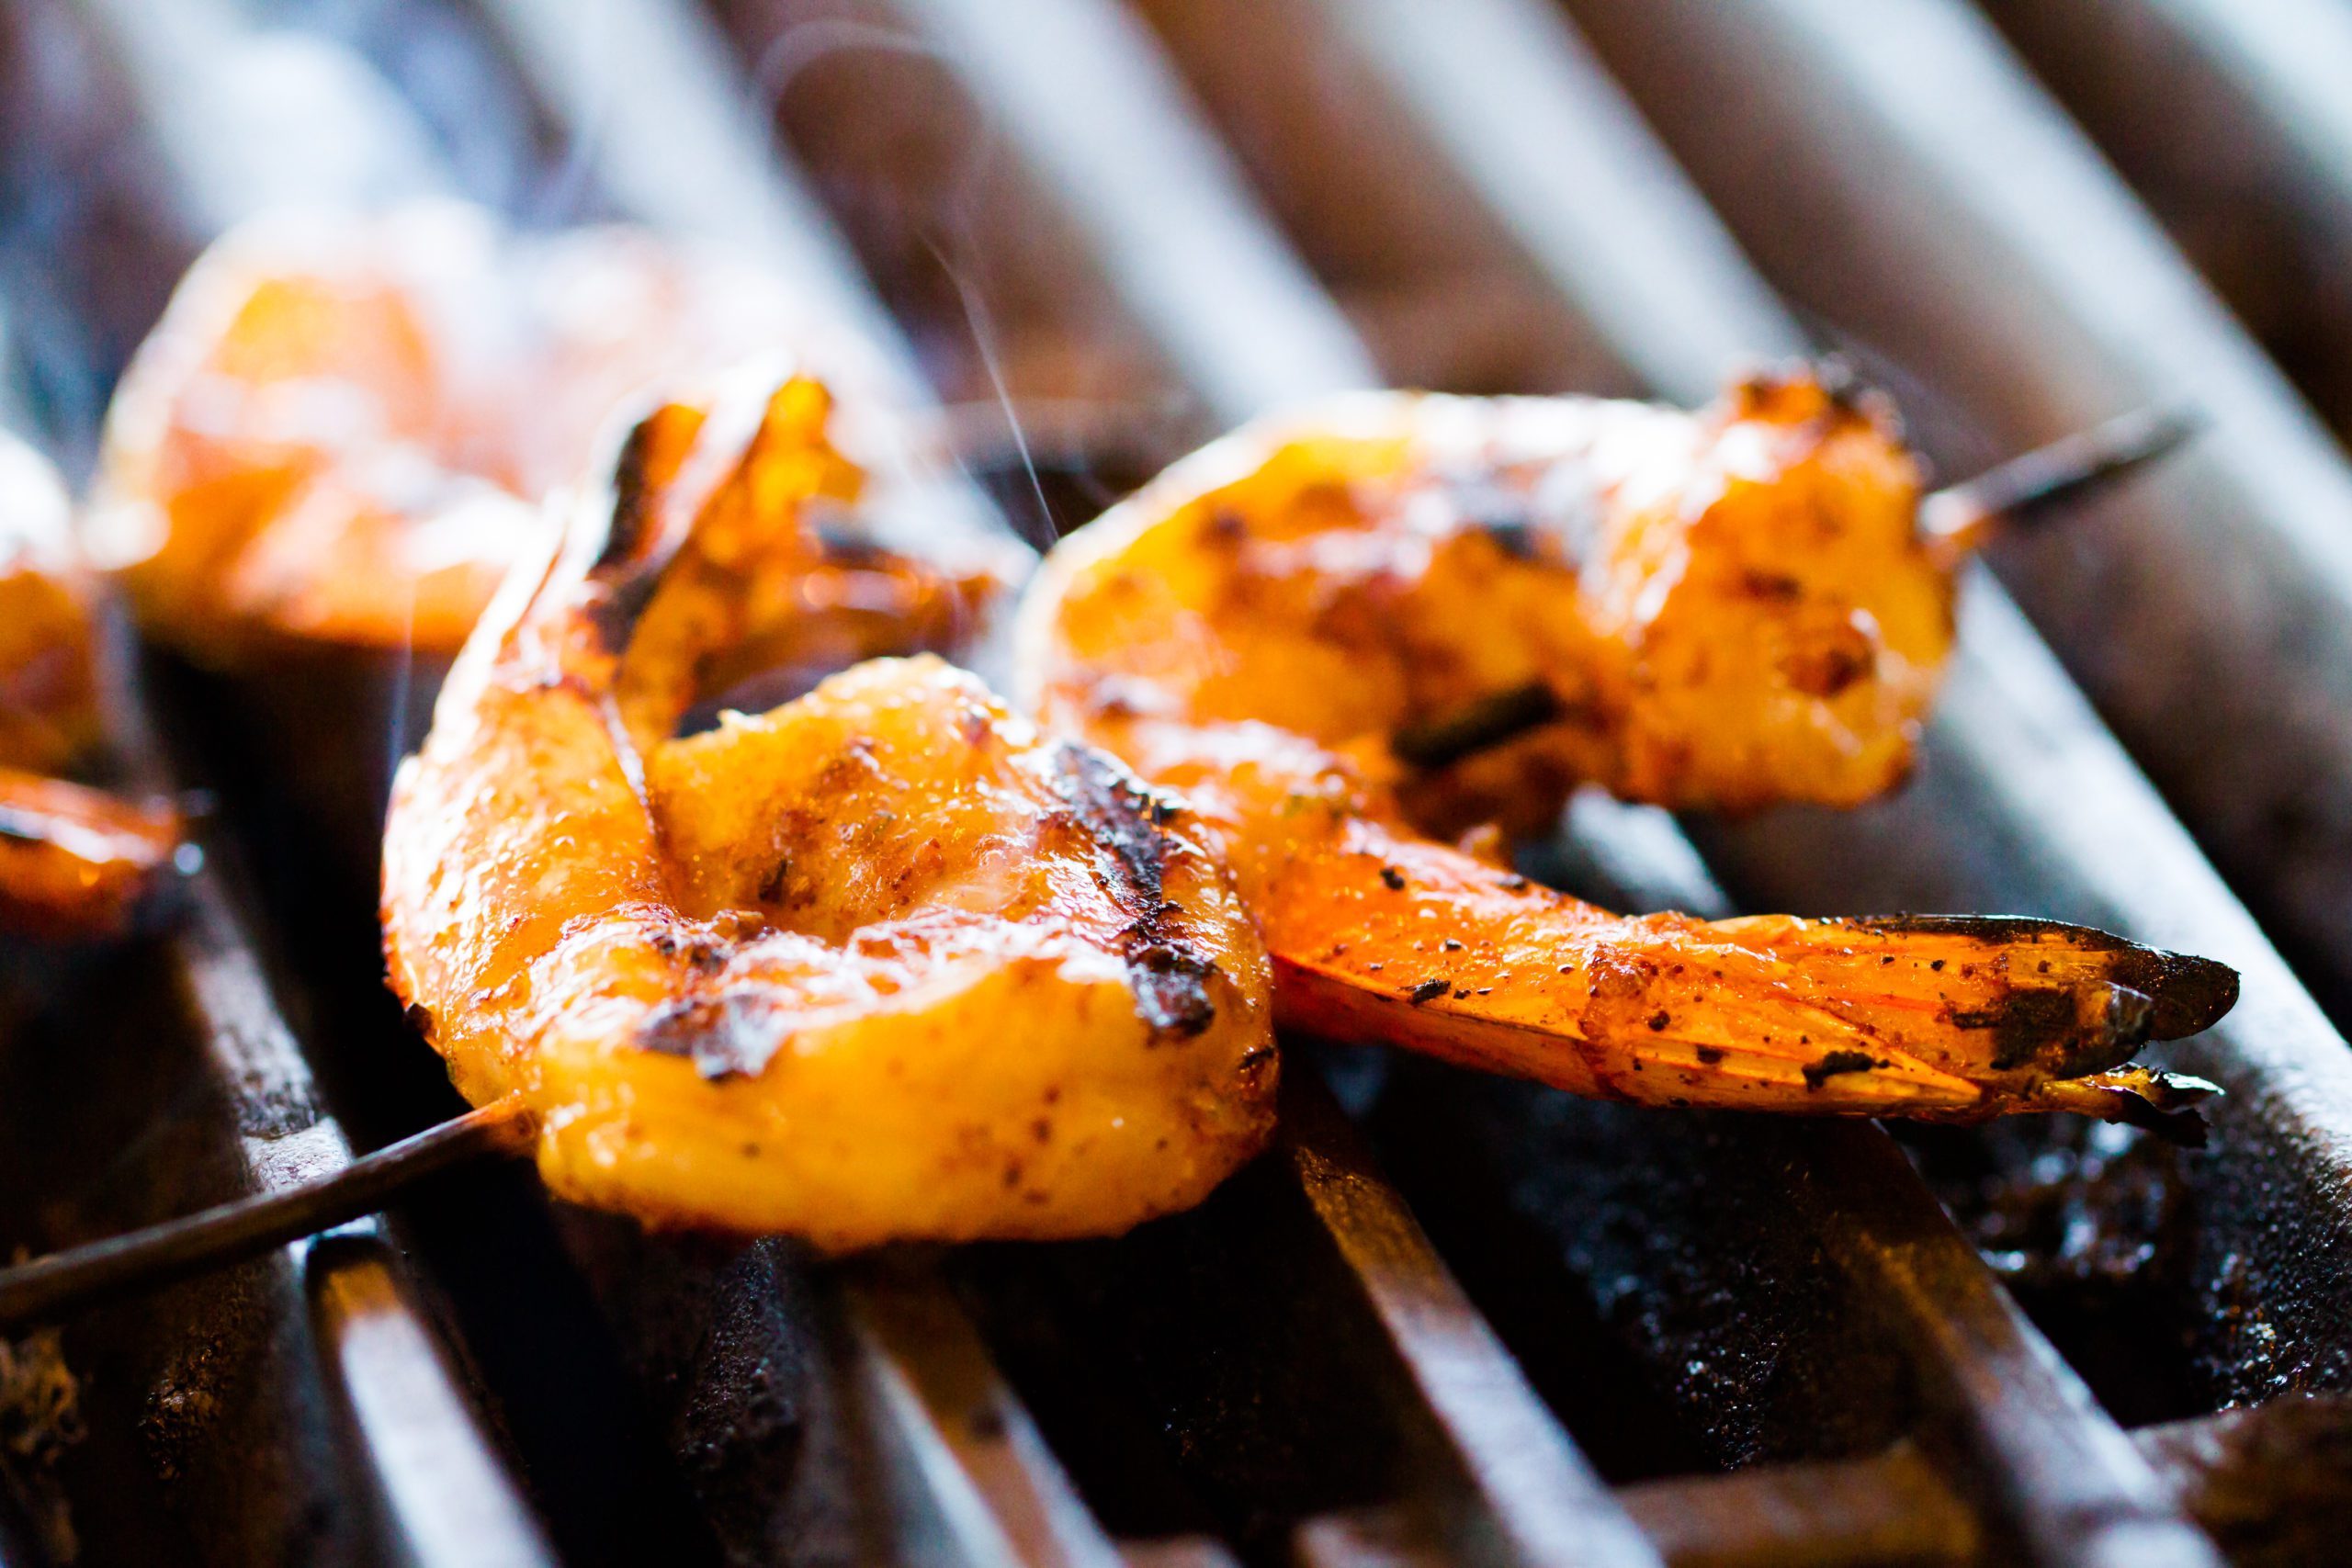
Grilled Jerk Shrimp
Grilled jerk shrimp is an amazing dish packed with flavor! Here’s a simple recipe to make it:
Grilled Jerk Shrimp Ingredients:
- 1 pound large shrimp, peeled and deveined
- 2 tablespoons olive oil
- 2 tablespoons jerk seasoning (store-bought or homemade)
- 2 cloves garlic, minced
- 1 tablespoon fresh lime juice
- Salt and pepper to taste
- Lime wedges, for serving
- Chopped fresh cilantro or parsley, for garnish (optional)
Instructions For Cooking
- Prepare the shrimp: In a large bowl, toss the shrimp with olive oil, jerk seasoning, minced garlic, lime juice, salt, and pepper. Make sure the shrimp are evenly coated with the seasoning mixture. Let them marinate for about 15-30 minutes in the refrigerator.
- Preheat the grill: Preheat your grill to medium-high heat. Make sure the grates are clean and lightly oiled to prevent sticking.
- Skewer the shrimp: Thread the marinated shrimp onto skewers, making sure to leave a little space between each shrimp.
- Grill the shrimp: Place the shrimp skewers on the preheated grill. Cook for 2-3 minutes on each side, or until the shrimp are pink and opaque, and have nice grill marks.
- Serve: Once cooked, remove the shrimp skewers from the grill and transfer them to a serving platter. Squeeze fresh lime juice over the shrimp and garnish with chopped cilantro or parsley, if desired. Serve immediately with extra lime wedges on the side.
Enjoy your delicious grilled jerk shrimp as a flavorful appetizer or main dish!
Try this amazing dish on your next camping trip to Camp Lakewood Campground!
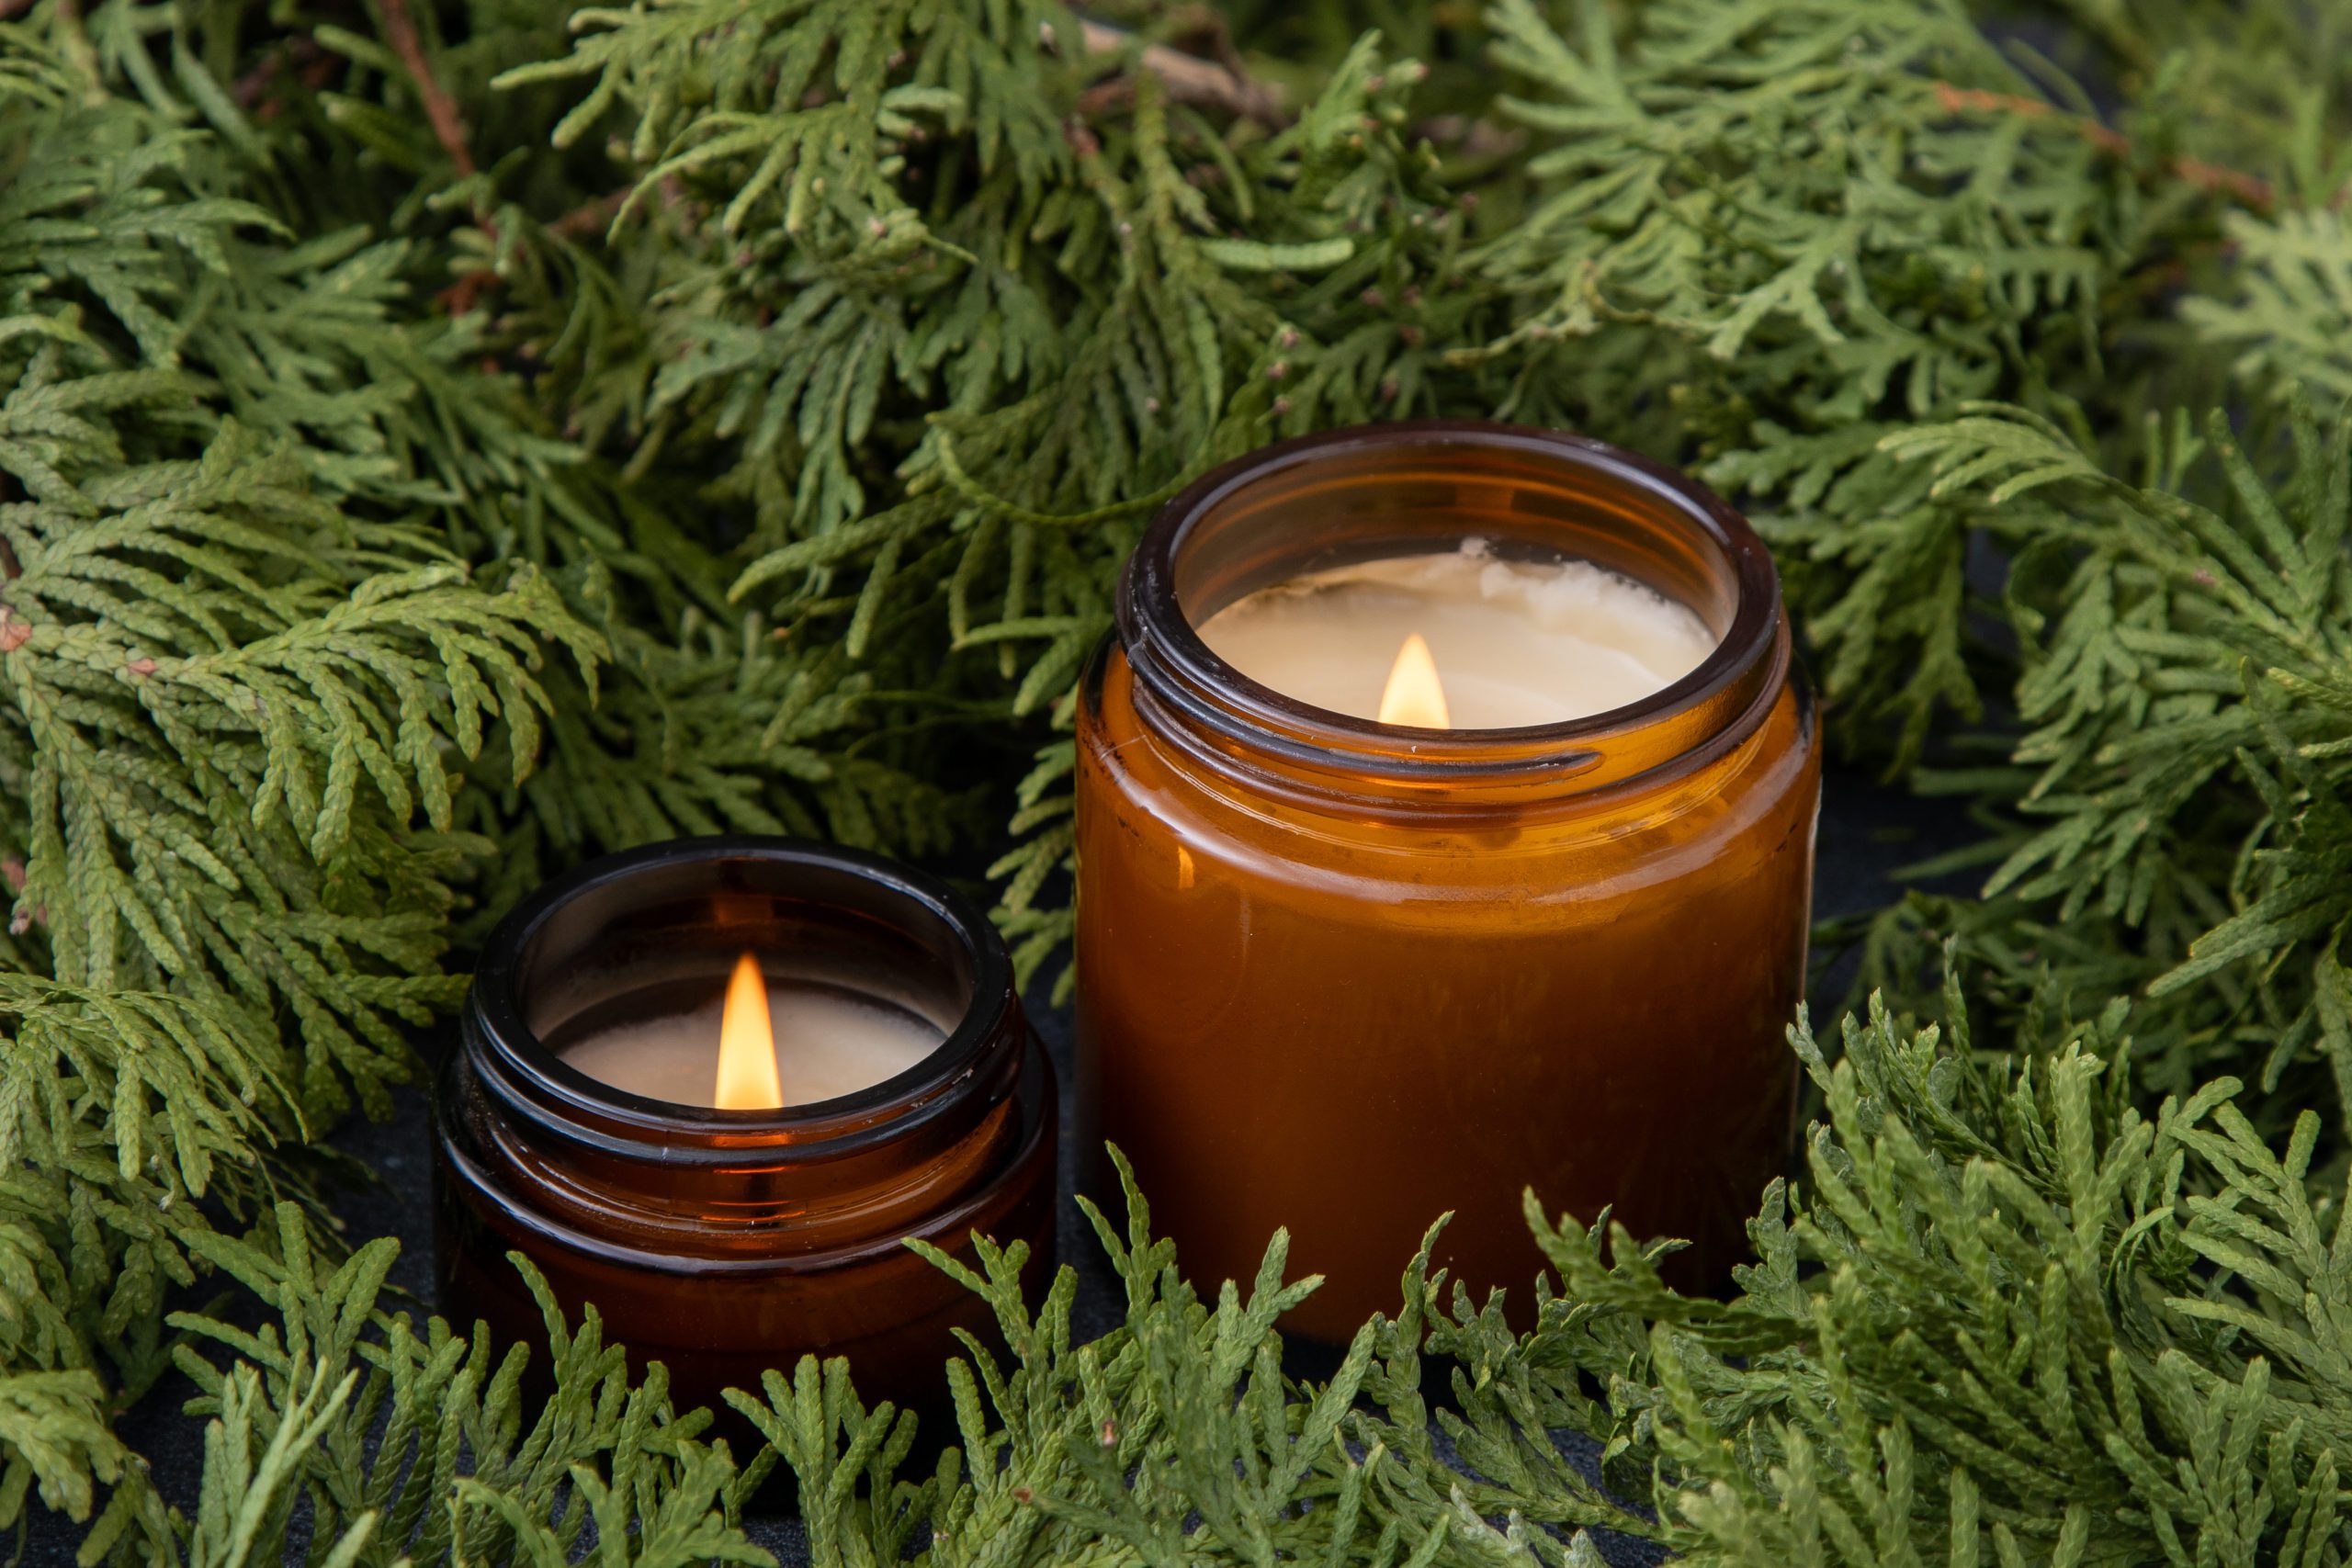
DIY Mosquito Repellent Candle
Making your mosquito-repellent candle can be a fun and effective way to keep those pesky insects at bay during outdoor gatherings. Here’s a simple recipe you can try:
Materials:
- Candle wax (soy wax or beeswax are good choices)
- Wick
- Essential oils (such as citronella, eucalyptus, lavender, lemon, and/or peppermint)
- Candle container (such as a glass jar)
- Double boiler or heat-safe container for melting wax
- Stirring utensil
- Measuring cup
- Optional: dried herbs like rosemary or mint for added potency
Instructions:
- Prepare Your Work Area: Set up your workspace with all your materials. Make sure the area is well-ventilated as melting wax can produce fumes.
- Prepare Your Container: Place the wick in the center of your candle container. You can use a bit of melted wax to adhere the wick to the bottom of the container and keep it centered.
- Melt the Wax: Use a double boiler or a heat-safe container placed in a pot of water to melt the wax. Heat the water to a gentle simmer and place the wax in the top container. Stir occasionally until the wax is completely melted.
- Add Essential Oils: Once the wax is melted, remove it from the heat and let it cool slightly. Then, add your chosen essential oils. Citronella is a popular choice for repelling mosquitoes, but you can also use other oils like eucalyptus, lavender, lemon, and peppermint. Be sure to add enough oil to scent the wax, usually around 30-50 drops per cup of wax, but you can adjust to your preference. Stir the oils into the wax thoroughly.
- Optional: Add Dried Herbs: If you want to boost the potency of your candle, you can add dried herbs like rosemary or mint. Simply stir them into the wax along with the essential oils.
- Pour the Wax: Carefully pour the scented wax into your candle container, making sure not to disturb the wick. Leave a bit of space at the top to avoid overflow.
- Let it Set: Allow the candle to cool and set completely. This can take several hours, depending on the size of your candle.
- Trim the Wick: Once the candle is fully set, trim the wick to about ¼ inch above the wax surface.
Your DIY mosquito repellent candle is now ready to use! When lighting the candle, make sure to place it in a safe location away from flammable materials and never leave it unattended. Enjoy your bug-free outdoor gatherings!
Be a step ahead of the bugs and make your own mosquito repellent candle for your next camping trip to Camp Lakewood Campground.

Glow-in-the-Dark Ring Toss
A glow-in-the-dark ring toss game can be a fantastic addition to a nighttime party or outdoor event. Here’s how you can create your own glow-in-the-dark ring toss game:
Materials needed:
- Glow sticks or glow bracelets
- Plastic rings (you can purchase these or make them using plastic piping or foam)
- A flat surface for setting up the game (such as a table or the ground)
- Markers or tape (optional, for marking the throwing line)
- Scissors (if using glow sticks that need to be activated)
Instructions:
- Activate the glow sticks or glow bracelets according to the instructions on the packaging. This usually involves snapping or bending the sticks to activate the chemicals inside that create the glow. Make sure they’re glowing brightly before proceeding.
- Arrange the glow sticks or bracelets into a circle shape on the ground to create the targets for the ring toss. You can make multiple circles with varying distances to increase the difficulty level.
- Mark a throwing line using markers or tape. This line should be a suitable distance away from the targets, depending on the age and skill level of the players.
- Distribute the plastic rings to the players. If you’re using homemade rings, make sure they’re lightweight and large enough to easily toss onto the targets.
- Explain the rules of the game to the players. Typically, players take turns tossing their rings from behind the throwing line, trying to land them onto the glowing targets. Assign point values to each target based on its difficulty level (e.g., higher points for smaller circles or farther distances).
- Keep track of each player’s score as they take turns tossing their rings. The player with the highest score at the end of the game wins!
Remember to play the game in a dark or dimly lit area to fully enjoy the effect. Additionally, ensure that the playing area is safe and free from any obstacles that could cause tripping or accidents. Enjoy your glow-in-the-dark ring toss game!
While camping at Camp Lakewood Campground, try out this special Ring Toss!
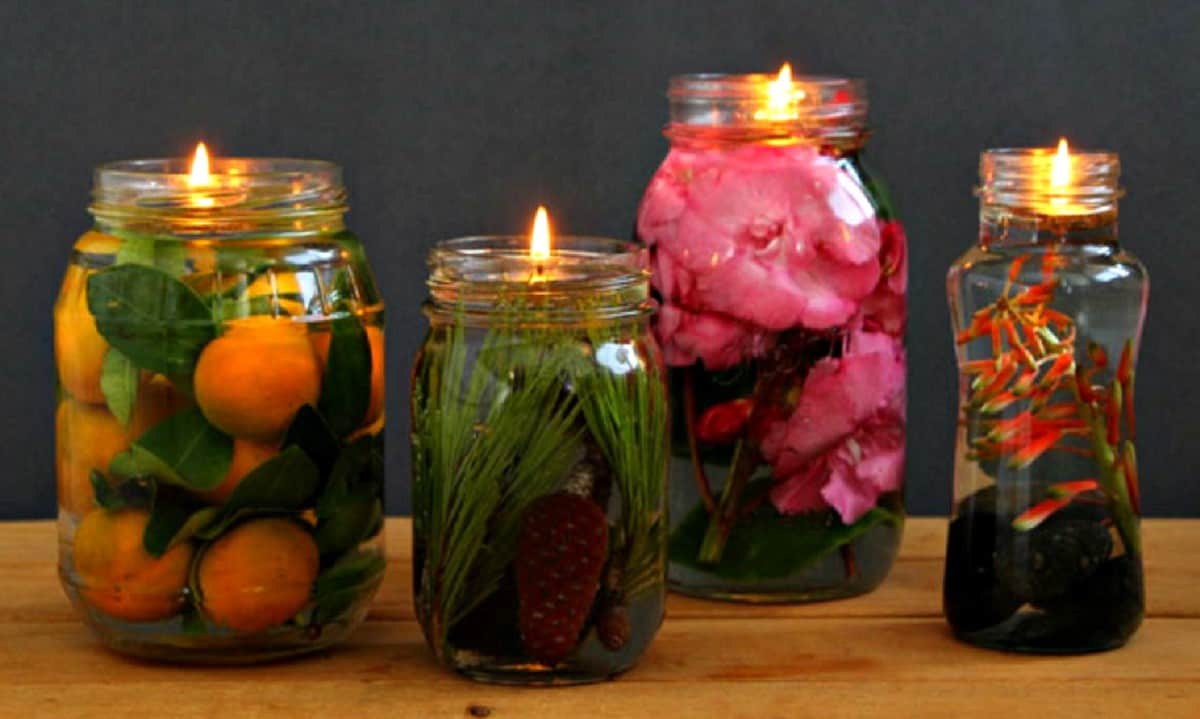
Scented Mason Jar Candle
Creating a scented Mason jar candle can be a fun and creative DIY project. Here’s a simple guide to help you make your own scented Mason jar candle:
Materials:
- Mason jar
- Candle wax (soy, paraffin, or a blend)
- Candle wick
- Wick holder or adhesive
- Fragrance oil or essential oil
- Double boiler or microwave-safe container
- Stirring utensil
- Thermometer
- Optional: Dye for coloring (if desired)
Instructions:
- Prepare the Jar:
- Ensure the Mason jar is clean and dry.
- If you like, decorate the jar with ribbon, twine, or any other decorative elements.
- Secure the Wick:
- Attach the wick to the bottom center of the Mason jar using a wick holder or adhesive.
- Ensure the wick is centered and straight.
- Melt the Wax:
- Use a double boiler or a microwave-safe container to melt the candle wax.
- If you’re using a double boiler, place the wax in the top part and heat until melted.
- If using a microwave, heat the wax in short intervals, stirring in between, until fully melted.
- Add Fragrance and Color:
- Once the wax is melted, let it cool slightly.
- Add your desired amount of fragrance oil or essential oil. The amount will depend on the type and strength of the fragrance.
- If you want a colored candle, add dye according to the instructions on the packaging. Stir well.
- Check Temperature:
- Use a thermometer to check the wax temperature. Different waxes have different optimal pouring temperatures, so follow the recommendations for your chosen wax.
- Pour the Wax:
- Pour the scented wax into the Mason jar, leaving about half an inch from the top.
- Ensure the wick stays centered as the wax cools.
- Cooling and Finishing:
- Allow the candle to cool completely.
- Trim the wick to about 1/4 inch above the surface of the wax.
- Once fully set, you can decorate the jar further or leave it as is.
- Curing Time:
- Let the candle cure for a day or two to allow the fragrance to fully develop.
Now you have your own scented Mason jar candle! Light it up, and enjoy the cozy ambiance and delightful fragrance.
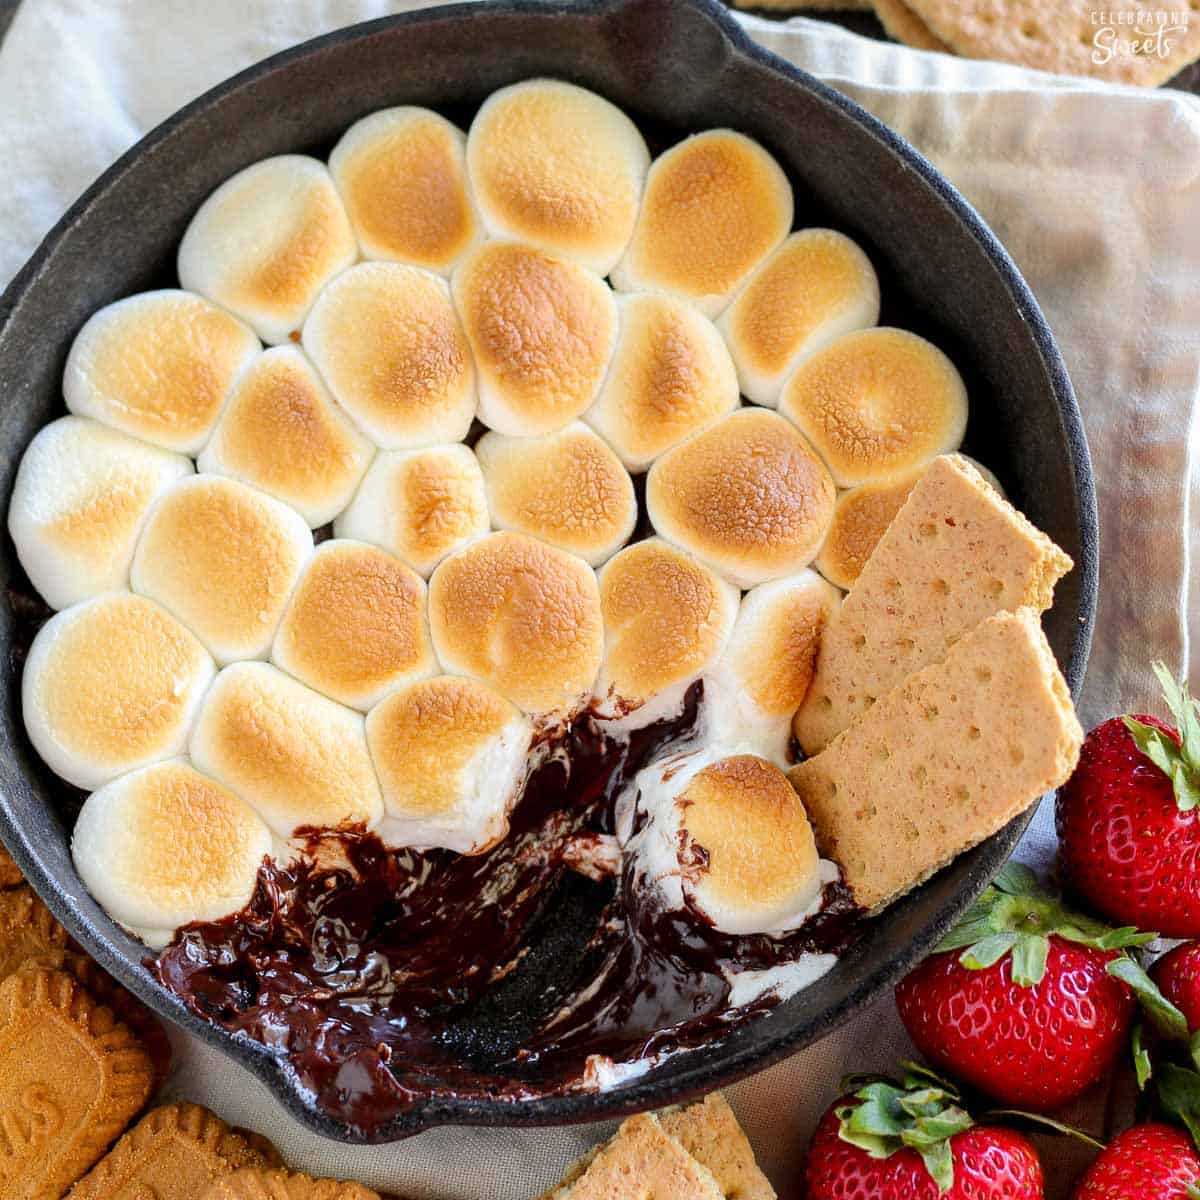
Puffy S’More Dip
It sounds like you’re interested in making a camping-inspired dish called Puffy S’More Dip. This is a fun and delicious treat that brings the flavors of traditional s’mores into a dip form. Here’s a simple recipe for you:
Ingredients:
- 1 cup chocolate chips
- 1 cup mini marshmallows
- 1/4 cup milk
- Graham crackers or cookies for dipping
Instructions:
- Prepare Campfire or Oven:
- If you’re camping, set up a campfire. If you’re at home, preheat your oven to 350°F (180°C).
- Assemble Ingredients:
- In a cast-iron skillet or an oven-safe dish, combine the chocolate chips, mini marshmallows, and milk.
- Heat Mixture:
- Place the skillet or dish over the campfire or in the preheated oven. If you’re using a campfire, you can cover the skillet with aluminum foil to help melt the ingredients evenly. Stir occasionally until the chocolate and marshmallows are melted and well combined.
- Serve:
- Once the mixture is smooth and gooey, remove it from the heat.
- Dip and Enjoy:
- Use graham crackers or your favorite cookies to dip into the melted chocolate and marshmallow mixture.
- Optional: Puff it Up:
- If you want to add a “puffy” element, consider bringing along some pre-made biscuit dough or crescent roll dough. Wrap small portions of the dough around the end of a skewer and cook it over the campfire or in the oven until it’s golden brown. Then, use the puffy dough to scoop up the S’More dip.
This Puffy S’More Dip is a delightful and shareable camping treat that captures the essence of traditional s’mores in a new and creative way. Enjoy your camping adventure and the delicious flavors of this sweet dip!
Share this sweet treat around the campfire at Camp Lakewood Campground.
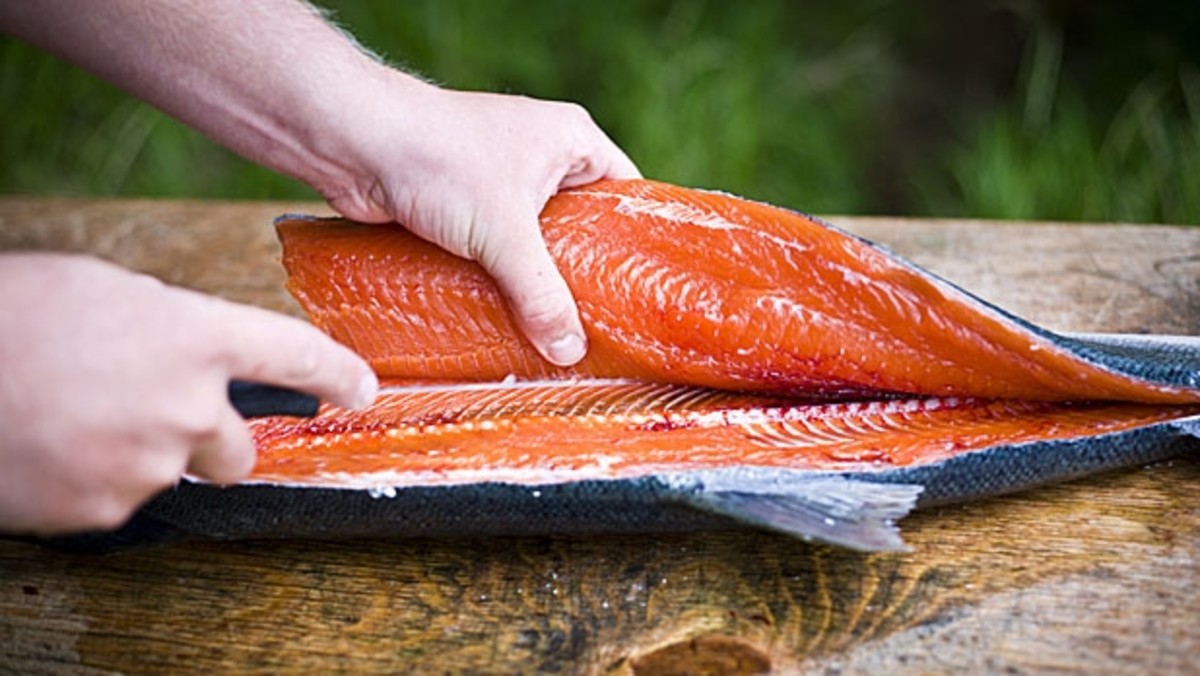
How to Fillet a Fish
Filleting a fish involves removing the bones and separating the edible flesh from the rest of the fish. Here’s a basic guide on how to fillet a fish:
Materials needed:
- Whole fish
- Sharp fillet knife
- Cutting board
- Towel or paper towel
Steps:
- Prepare your workspace:
- Make sure your cutting board is clean and secure.
- Have a towel or paper towel nearby to wipe your hands and the knife.
- Scale the fish (optional):
- Use a fish scaler or the back of a knife to remove scales if the fish is not already scaled.
- Remove the head (optional):
- Some people prefer to fillet the fish with the head on, while others prefer to remove it. If you want to remove the head, cut just behind the pectoral fin and gill plate, angling the cut slightly towards the head.
- Make the initial cut:
- Lay the fish on its side and make a deep, diagonal cut behind the pectoral fin, down to the spine. This cut will be the starting point for the fillet.
- Follow the spine:
- With the initial cut made, turn the knife and run it along the spine, keeping the blade close to the bones. Use smooth, sweeping motions, and let the knife guide along the contour of the fish.
- Lift the fillet:
- As you cut, use your free hand to gently lift and separate the fillet from the bones. Continue cutting until you reach the tail.
- Repeat on the other side:
- Flip the fish and repeat the process on the other side.
- Remove the rib cage:
- Once both fillets are removed, you can trim the rib cage by making a cut along the rib bones on each fillet.
- Skinning (optional):
- If you prefer skinless fillets, you can use a knife to separate the skin from the flesh. Make a small cut at the tail end and hold the skin taut while sliding the knife between the skin and the flesh.
- Inspect and clean:
- Check for any remaining bones or scales on the fillets. Trim away any dark or red meat, if desired.
Final Thoughts:
Remember, practice makes perfect when it comes to filleting fish. It may take a few attempts to become proficient, so be patient and take your time. Additionally, always use a sharp knife to ensure clean and precise cuts.
Try this neat skill on your next camping trip to Camp Lakewood Campground!

Family owned and operated, Kiefer Campgrounds strive to offer you the best rates for a comfortable location with outstanding service, and spotless facilities. When you stay in one of our parks, you are no longer just a happy camper, but a part of our family! We are most certain you will enjoy your stay with us. Pick your favorite location and book your spot now before it’s too late! You’ll be happy you did!